This article will show you how to use the PA-35 Wi-Fi control box to control actuators that require a large amount of current draw. A video demonstration of the PA-17 Heavy Duty Linear Actuator, being controlled using a smartphone, is shown below:
Selecting a High-Current Linear Actuator
The PA-17 Heavy Duty Linear Actuator and the PA-13 High Force Industrial Actuator both draw up to 20 amps of current when fully loaded. We will use the PA-17 model as an example in this article. You can choose a control box rated to provide this much current, but what if you wanted the range and convenience of the Wi-Fi Control Box?
The PA-35 Wi-Fi Control Box is a 12V actuator controller and limits you to 10 amps per channel, which will not work for the PA-17 Heavy Duty Linear Actuator. However, the solution to this problem is to use relays in conjunction with the control box, which allows you to control up to four actuators at any current rating, as long as the mechanical relays are rated to handle it. See our relay setup below.

What You Will Need
Here is a list of components that were used in our demonstration:
- 1 x PA-35 Wi-Fi Control Box.
- 1 x PA-17 Heavy Duty Linear Actuator.
-
2 x SPDT 20A Mechanical Relays.
- Optional: AC-30-30-12 SPDT 30A Relays.
- 1 x PS-40-12 110-230VAC 40A Power Supply.
-
1 x AC-15 110-240VAC 10A Power Adapter.
- Optional: You can take +12V from the PS-40-12, as long as there is sufficient current to supply the actuators and control box.
Modifying the Wi-Fi Control Box
In order to connect relays to the output of the Wi-Fi Control Box, you will need to gain access to the screw terminals inside. Make sure you work carefully so that you do not damage the internal circuitry. Additionally, it may be helpful to take pictures before disconnecting anything just in case you need to start from the beginning again. The wiring process can be done in five steps. Let’s go through them.
Step 1
Unplug all power sources from the Wi-Fi Control Box before opening it up. From here, you can unscrew the 4x screws as shown below. Place the screws in a safe place to avoid losing them.

Step 2
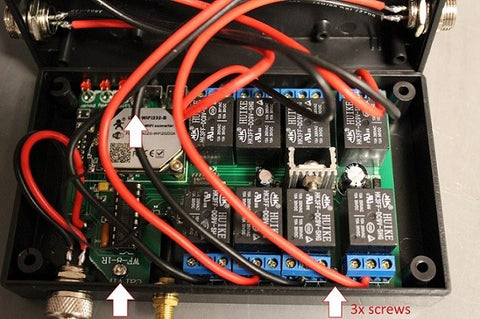
Once the cover has been removed, unscrew the 3x screws to free the circuit board.

Step 3
Lift the side of the circuit board that is opposite of the LEDs. This is to ensure that the circuit board can slide out without bending the LEDs. Note that the circuit board does not need to be removed completely – enough space is required to have access to the connections on the side of the board.

Step 4
Once the circuit board is exposed, we’ve labeled the outputs in reference to the wiring diagram of the physical circuit. This wiring diagram is illustrated in Step 5. The connections on the circuit board and labels are shown below for visualization.

Step 5
Below, is the wiring diagram of the Wi-Fi controller for the linear actuator (PA-17 heavy-duty linear actuator). You can see that the two relays have been attached to the control box, the power supply, and the linear actuator. Double-check your connections before switching on the power supply to avoid damaging any components that may have been connected incorrectly.

Connecting Your Smartphone
Thanks to the control box, connecting your smartphone to the Wi-Fi controller actuator is simple. Once all the wiring has been completed and you have powered up the PS-40-12 with no problem, ensure you have downloaded the application on your phone to control the linear actuator.
Here is a link to the application, Wi-Fi Control Application Download, and below is a video that explains how you can connect your Android/iOS device to the Wi-Fi Control Box:
Conclusion
Using the Wi-Fi Control Box and the smartphone application to control a linear actuator is super convenient and has numerous applications for when you don’t want to use a wired switch. Try and add to this example project by using a second linear actuator connected to the second channel on the Wi-Fi Control Box.
If you have any questions or concerns regarding actuators, please do not hesitate to reach out to us at 1-800-676-6123 or email us at sales@progressiveautomations.com. Our experienced team of engineers is more than happy to help, the best way we can, with whatever you need.


